For the main assignment in this Lesson, students will make a simple landing page for their PASS web directory. In future lessons, we will upload additional websites to PASS, and this landing page will act as a home page of sorts.
In order to develop a final design, we will use Illustrator to create a 2D mockup of the final website, and then use that as a roadmap when creating the final landing page. Mockups typically focus on simulating user interaction (buttons, pop-ups, links, etc.) but since landing pages are so simple, you can think of your design largely as a 2D composition like a poster or a painting.
Objectives
- Create a lively and unique design using only text.
- Practice working with a 12 column grid layout.
- Create a 2D mockup in Illustrator as a basis for a future web page.
Requirements
The landing page should include a variety of text, arranged to create an interesting visual composition that welcomes users to your web space. The landing page should convey something about yourself, similar to the self-portrait site from Lesson 1, but only using text. Come up with a theme or visual concept to base your landing page around. Consider the use of color and font choice, as well as creative use of a grid layout.
The page should include:
- Your name
- A link to your Wordpress blog (e.g. "My blog")
- Space to add links to future websites
- Additional text such as a:
- Poem
- Quote
- Joke
- Recipe
- Description
- Song lyrics
- ???
Illustrator Setup
- Create a new Illustrator project using the "Web" template (1280px x 1024px).
- Create a rectangle using the Rectangle tool (M) and adjust it so that it filler the artboard exactly.
- Select the rectangle with the Selection tool (V)
- While it's selected, choose Object >>> Path >>> Split into Grid
- In the pop-up window, create 1 row and 12 columns; this will split your rectangle into 12 sections.
- While all the shapes are still selected, choose View >>> Guides >>> Make Guides.
- If you accidentally deselected them, select all with ⌘+A (Mac) or CTRL+A (Windows).
- Your shapes should have been transformed into thin cyan lines. These are guides.
- Use guides to help keep your design based within a grid system.
- Under View >>> Guides, you can toggle guides on and off, or lock/unlock them.
- The keyboard shortcut for toggling guides is ⌘+; (CTRL+; for Windows).
- When guides are locked, you can't select them. Keep them locked for this assignment.
Adding Text
NOTE: There are two ways to use the Text tool (T) to create text
- Click once to create Point Text (best for headers). Resizing the text box will increase the font size. Hold shift to maintain proportion and avoid stretching your text.
- Click and drag to create Area Text (best for body text). Resizing the text box will change the shape of the text box, and the text will flow within it, maintaining the same font-size.
Select either type of text object with the Selection tool to change the color, size, font, etc. Look in the top menu bar or open the Character window (Window >>> Character).
To bring up a full color picker, double click on the color swatch at the bottom of the lefthand toolbar.
Fonts
Illustrator can access any fonts on your computer, but when we create the final website for this assignment, we will will need to supply any custom fonts besides the core web-safe fonts. In order to make that process as easy as possible....
NOTE: Only use custom fonts from Google Fonts.
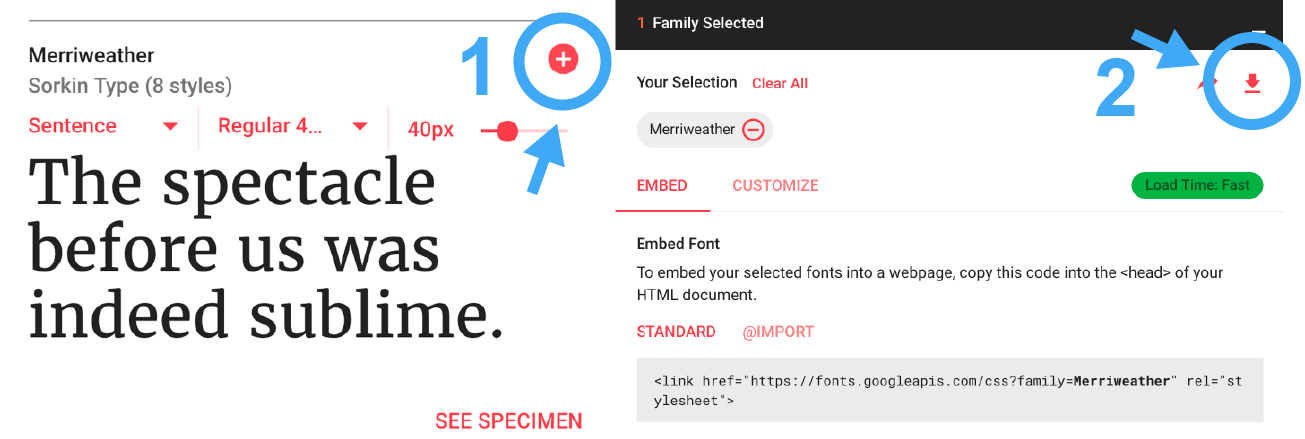
How to download Google Fonts: Click the + button to select one or more fonts. Then click the black bar to view your fonts, and click the download button. Double-click the downloaded font files to install them.
Flexible Layout
Your landing page mockup should be 1280px x 1024px — but web browsers can stretch to fit many different dimensions...
The HTML template we're going to use for the assignment handles this by arranging everything in rows and columns. Each row can contain up to 12 columns, but when the browser gets narrow, each column changes to a full 12-sections. This is pretty standard behavior for modern websites, but it will be helpful to keep in mind while designing your mockup.
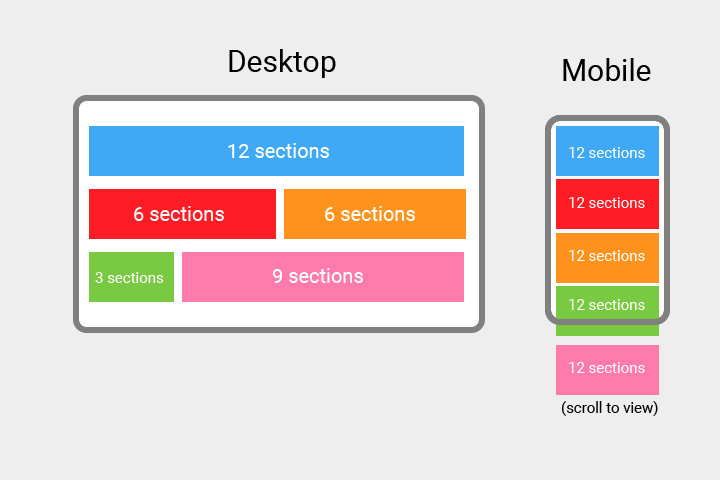
Remember: You're designing on a grid of columns, but each column is contained within a row. Which means it will be tricky to make a big vertical column, white it will be easy to make a big horizontal row. Luckily we usually read text horizontally.
Landing pages are usually composed like a big painting, and they keep all the content on screen at once. In design terms, this is called keeping the content above the fold. It's a term inherited from print design, but in today refers to everything at the top of the page (that you don't have to scroll to see). This is traditionally the most valuable real-estate in a design, but many designers are challenging that rule by creating sites that encourage scrolling as a act of discovery. But as a quick welcome page to your web space, these landing pages should probably not be super long. So try to keep everything above the fold.

Inspiration
- Search for examples of "typographic posters" or "creative typography" on Google, Pinterest, or Tumblr.
- Check out Typographic Posters.
- Look at your favorite album art, book covers, or magazines.